Field Note – Process Manual
OVERVIEW
The Fieldnote app is a designed app that will handle our Ticket Management system for Information. This app will be able to track time, upload photos as well as retain job notes that are created on-site. Also, the app will submit information from the Technician to the office in regards to Quote information as well as Material information per the technician on-site. The app will also create the schedule for the day and have the schedule on the app with the date and time the ticket is scheduled. This is all encompassing passing along information from the job to the office to be detailed and noted for the client.
Downloading the App
IOS: https://testflight.apple.com/join/qocuf2gv
Android: https://armpublic.s3.amazonaws.com/fieldnote/installs/android.35.24030201.apk
This link will take you to the direct application on your phone. From here, you will download the application onto your phone and log in through the application. You will be able to login with your Teamarm email through the Microsoft365 login. Some of you may not have been added to the system so we will need to get you in there from the note instructions below.
NOTE: If you are not able to log in through the application, try to sign in with your Microsoft365 login credentials and let me know when you do so I can find you in the system to activate you.
USING THE APP
Logging In
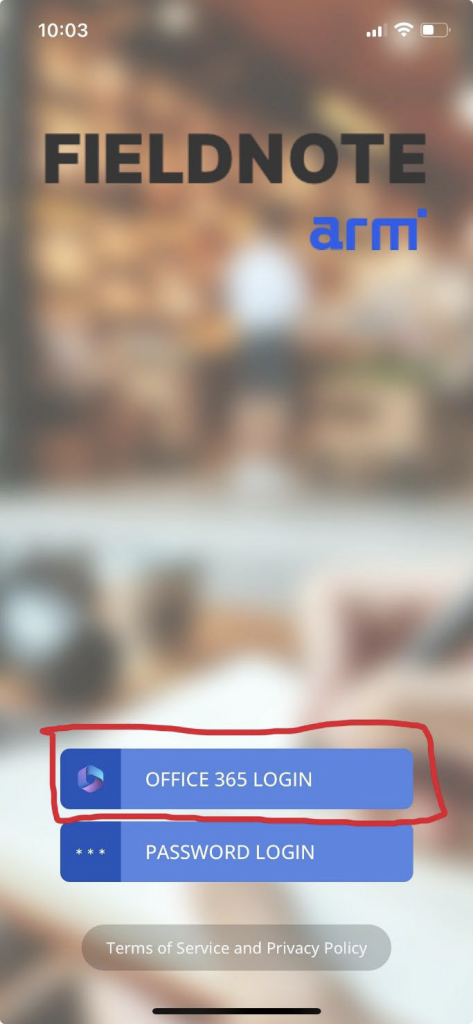
1. Open the Fieldnote App
2. Select the Microsoft365 Login
3. For the username use your Teamarm Email address for the username
4. Use your Teamarm password for the password
5. DO NOT ATTEMPT TO LOGIN THROUGH THE “PASSWORD LOGIN” option
Home Screen
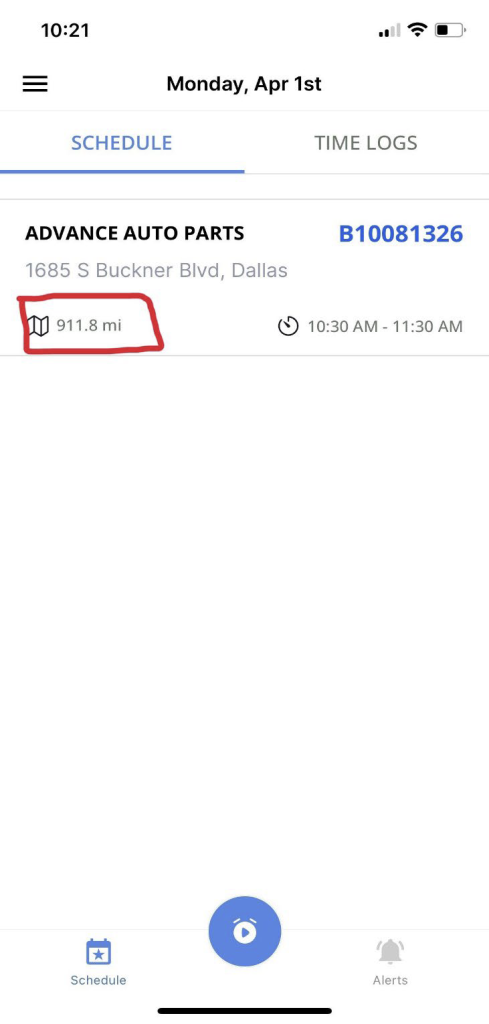
1. Once you are logged in, the main screen will be populated.
2. Your schedule will be populated on your screen with the Work Orders for the day.
3. The Date and Time will be at the Top
4. There will be the Schedule Tab as well as the Time Log tab
5. At the bottom of the screen you can navigate between the schedule view and alerts.
- Note: We will predominantly operate within the schedule tab at the bottom of the screen.
6. Also highlighted is the TIMER button that will dictate our actions throughout the course of the day.
7. The Work Order(s) for the day will be signified with:
- Client
- Work Order Number
- Address
- Time Scheduled

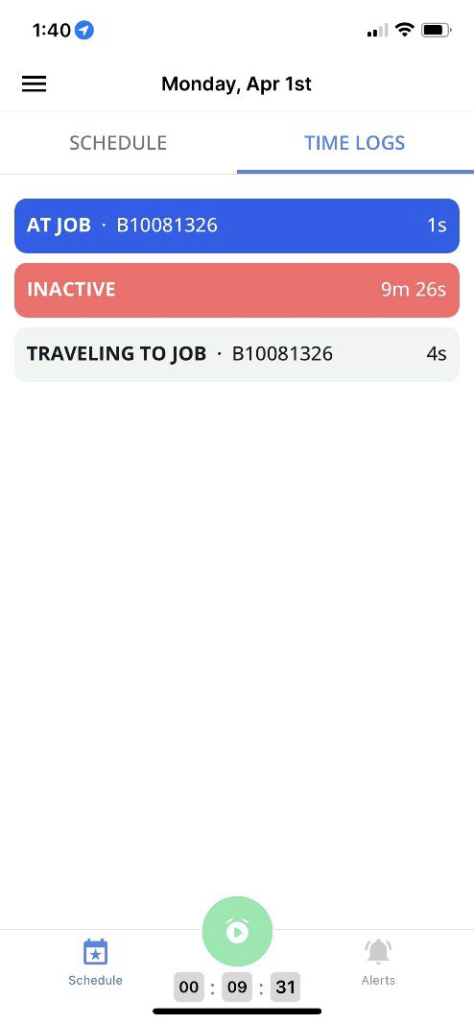
Time Logs
1. On the right hand side of the screen, you will see a tab titled TIME LOGS.
2. If you select the TIME LOGS tab, you will populate all of the actions that you do throughout the day.
3. Each time the TIMER button is utilized to submit an action, the action is updated in the TIME LOGS function to keep track of time associated with the day.
4. If you are not sure where you are at in the day, you can go to the TIME LOGS and see all of the actions that you have taken in the day and determine your next course of action.
LEAVING FOR WORK
Traveling to Site From Home
1. Select the Timer and hit travel to job site. Once this is selected, you will see the timer start at the bottom of the screen.

2. There will be several activities to choose from in the Function. They include:
- Travel to job site
- Travel for materials
- Other

3. Select TRAVELING TO JOB SITE with the Work Order Number. Since you are traveling, the log will continue until a new action is selected. You will have to select the Work Order you are traveling for.
- Note: Once you have selected TRAVELING TO JOB, you can go to the Time Logs feature on the right hand side of the screen. You will notice that the TRAVELING TO JOB has been logged and a timer is going for the travel.
4. If you want to see the location of the store/get directions, go to the Work Order in the Schedule function and select the map item in the bottom left corner.
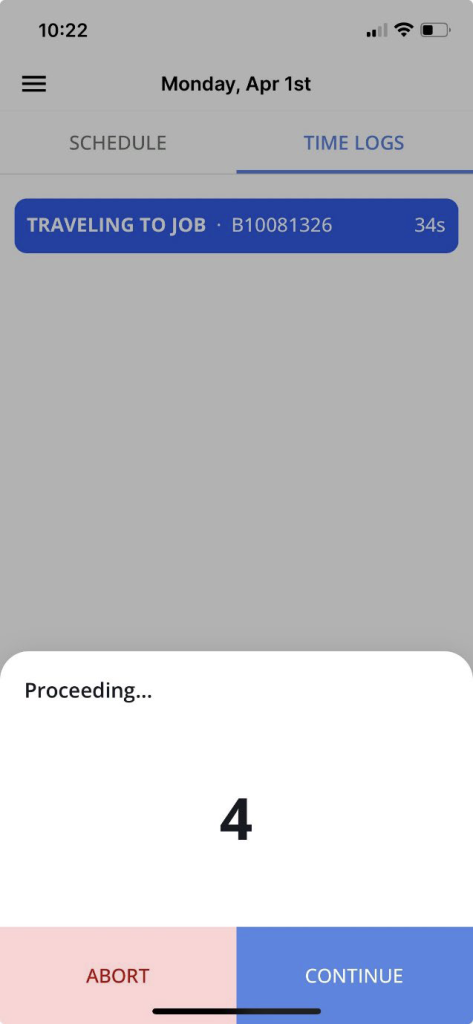
5. Once you reach your destination, hit the Timer button again.
- It will ask you to proceed, select “YES” if you are at the job site.
- There will be a countdown that you can bypass if you select “Continue”
Leaving Home for Materials
1. Look at your schedule to determine what work needs to be done for the day.
2. If your first Work Order requires you to travel for materials hit the TIMER button and select TRAVEL FOR MATERIALS.

3. This will create the log that you are travelling to purchase materials for the job.
4. Once you have purchased the materials and you are on the way to your job, hit the TIMER button and select TRAVEL TO JOB SITE.
- Note: You will have to select what Work Order you are traveling to for the Job Site
5. You can double check the TIME LOGS to make sure that you are traveling to the job by looking at the Time Logs function.
Leaving Home for Other Reasons
1. If you are leaving to pick up a rental car / travel for the company / retrieve materials or any other function for the company that does not have a Work Order associated, you will select the OTHER option for travel.
2. Hit the TIMER button and select OTHER.

3. Once you select OTHER, there will be a description box that populates asking for the reason of travel.
4. Type in the reason you are traveling for the company.
5. If you are going to a Work Order after the “Other” reason for travel, hit the TIMER button and select travel to job site, you will need to select the Work Order that you are traveling for.
6. If there is no other work that is needing to be performed, once you reach your destination hit the TIMER button and select the End Day option.
7. Select STOP THE CLOCK if you are at your destination.
Arriving Before Job Starts
1. Once you arrive to your Work Order, you may arrive early.
2. If you are early to a Work Order, simply select “No” when the app asks if you want to continue.
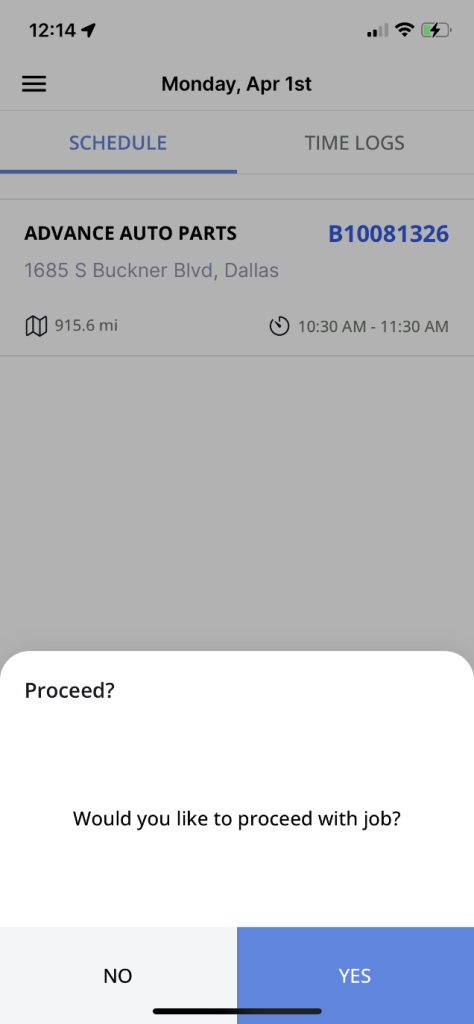
3. This will prompt an Inactive Log asking if you would like to register the action as “Inactive”
4. Select “Inactive”
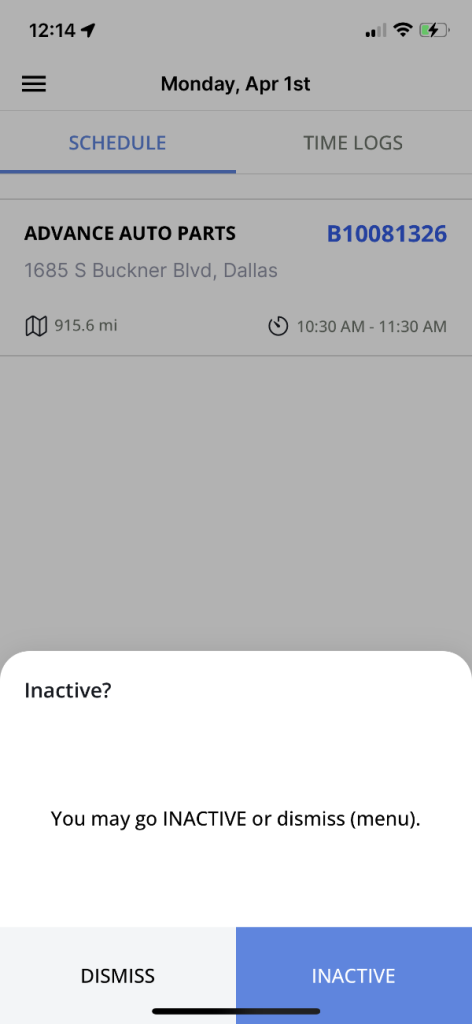
5. This will show that you were early to the job and were not able to meet with the Store Manager and start working upon arrival.
6. Once you are ready to begin work, select the TIMER button and select “Start the Job” from the list of actions.
7. If you are “Inactive” for longer than 5 minutes, the log will be highlighted in Red and you will need to type in the reason for the Inactivity by hitting the “Inactivity” log in the Time Log tab.
ON THE JOB
At the Job
1. When the countdown is finished or you have bypassed the countdown, you will notice in the TIME LOG tab that the next log is AT JOB with the timer running on the log.
- NOTE: The Timer for the whole day does not stop, the logs themselves of being at the job is what will change throughout the day.
2. Continue with the job and the next set of actions will be determined by what is required for the Work Order.
Uploading a Photo
1. When you want to upload a photo, select the timer button.
2. A list of actions will pop up.
3. Select CAPTURE IMAGE
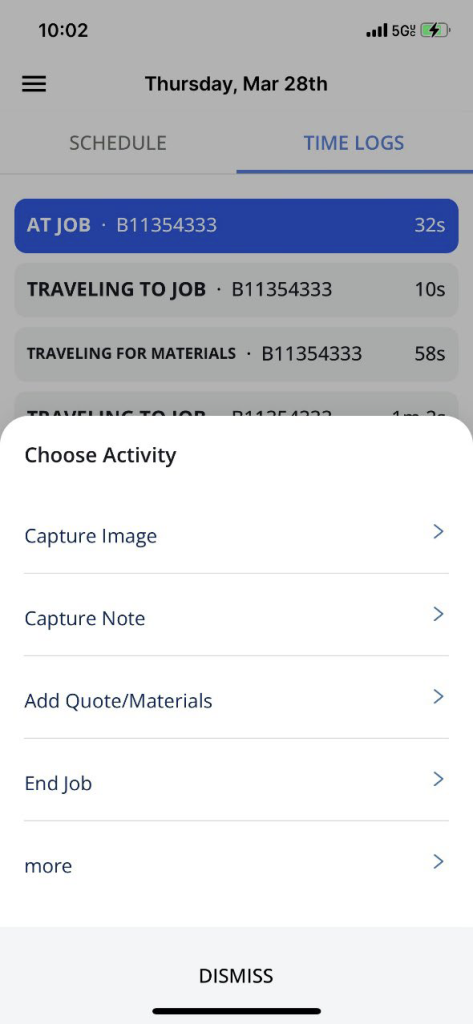
a. From there, it will either allow you to TAKE PHOTO or PICK FROM LIBRARY

b. If you take the photos on your phone, select the PICK FROM LIBRARY to upload the photo.
- Note: You can select multiple photos to upload from your phone.
c. If you select TAKE PHOTO, the camera will open and prompt you to take a photo
- Note: Make sure you are captioning the photos with descriptions on what’s going on in the photo
d. After you have taken a photo or uploaded a photo, in the log for AT JOB, if you select the log you will see the photo icon with a number in red next to it. This will be the photos you have taken and the amount you have taken.
Entering Job Notes
1. To enter notes for the Job, select the timer button again and select CAPTURE NOTE

- Once you have selected the TAKE NOTE action, JOB NOTES will pop up and you will enter into this selection the job notes you want to put in for the job.

- You can enter several selection of notes if you’d like or add one log of job notes detailing all of the work done on the work order.
- Every time you enter a note, there will be a saved selection with the time the note was entered.
Taking a Break
1. If you need to take a break, hit the Timer button and go to the MORE option and select TAKE A BREAK

2. When you select this, the log will appear stating ON BREAK
3. When you are done with being ON BREAK, hit the timer button again and it will return you to being back on the job.
Traveling for Materials
1. If you need to leave the job to get materials, hit the TIMER BUTTON and select the MORE option. TRAVEL FOR MATERIALS will pop up and select this option to pause the job to get materials.

- NOTE: When you leave to get materials, the timer for the job will be paused but your overall time for work will continue to run.
2. When you have returned to the Job, hit the Timer Button and the prompt “Returned from getting job materials” will pop up.
- Select YES
3. This will get the timer log for the job going again and your overall time will still be captured.
Quoting/Material for a Work Order
1. If the Work Order requires a Quote, hit the Timer button and select the ADD QUOTE/MATERIALS option.
2. Within this, you will need to Quote out everything you need in the description box.
- This includes Description, Time and Heavy Equipment
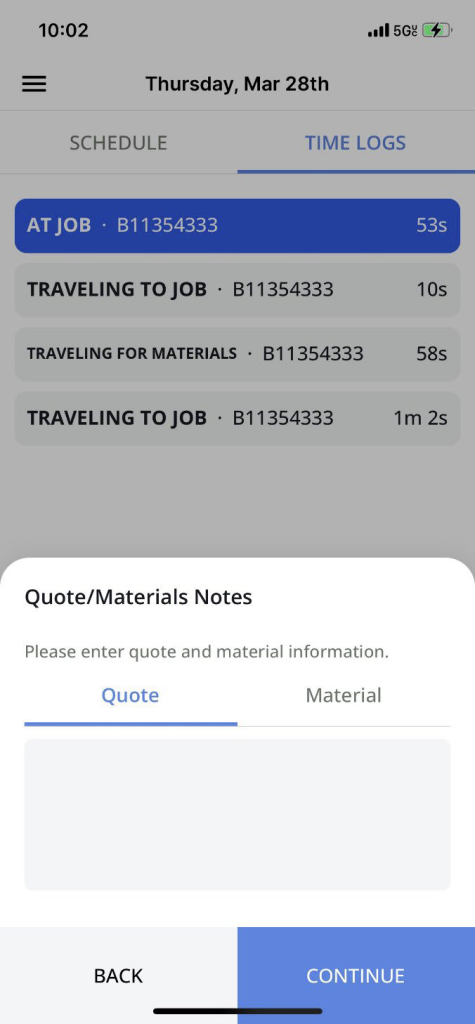
3. After you type in a QUOTE, you will select the MATERIAL tab and write down the materials you will need.
- This is any material that you will use for the WORK ORDER

4. When you create a QUOTE for a Work Order, the option for once the Work Order is as completed as much as possible will be RETURN TRIP NEEDED.

Completing the Work Order
1. Once we are finished with the Work Order, hit the timer button and select the END JOB option.

2. Once you have selected this option, the list of activities will immediately pop up.

3. Either you will select a RETURN TRIPS IS NEEDED or NO RETURN TRIP IS NEEDED.
4. If you need to come back to the job to finish a quote / wait for material or any instance in which the Work Order was not complete select the RETURN TRIP option.
5. If the Work Order has been completed, select the NO RETURN TRIP option
6. From there, you will be prompted into the next set of actions.
- START JOB – If you are starting at new job at the same job site
- TRAVEL TO JOB SITE – If the next work order is at a new location
- TRAVEL FOR MATERIALS – If you need to travel to pick up materials before the next Work Order
- OTHER – Traveling somewhere else that is not Work Order related i. Note: There may be a description of what is occurring if you select the “OTHER” option.
- END DAY – If you are cleared of your last Work Order and are heading home.
7. Select the Option that applies
Editing a Work Order
1. Once the Work Order has been completed, you will see in the Time Log that the “At Job” log has been greyed out.
2. If you need to get back into the work order, long click the log that has the “At Job” with Work Order in it.
3. Once you do this, a menu should pop up that shows a list of options that you can select from:
- Capture Photos
- Capture Notes
- Copy Work Order Number
- Manually Override
- There may be more options as well
4. Select the option that you need and it will bring up the page such as it does as when you are on the job.
5. You can double-check the edited information in the Work Order itself in the “Scheduled” portion.
Overriding an Active Log
1. If you are on a Work Order that will not allow you to progress, there is a good chance that you still logged into a log somewhere else.
2. If this is the case then you must go into the log that is “Active” and long press down on the log and manually override the “Active“ log.
3. Once you hit the “Manual Override”, the log should then go into Grey and let you know that the time will be set to when the ticket was scheduled.
- If this happens on a ticket, then you must go into the notes and type in the time you arrived to the store and the time you left the store.
Emergency Work Order
1. If you are done with your day and a Emergency Work Order comes onto your schedule you will hit the “Timer” button at the bottom of the screen and select “Travel to Job Site”
2. Once you get to the job site, hit the timer button again and complete the Work Order as you would any other Work Order.
3. After you are completed and there are no remaining Work Orders on your schedule. You can hit “End Day” again and proceed home.
4. Because the day has “Ended” it does not mean that the total time for the day will not be logged.
New Work Order After Day Has Ended
1. There are times when you may be driving home and a Work Order has been assigned to you.
2. If this happens, “End Your Drive” and your day will be logged in the log.
3. However, because there is a new Work Order, simply hit the timer button again and select “Travel to Job Site”.
4. You are now traveling to the job site.
5. Once you get to the job site, hit the timer button again and complete the Work Order as you would any other Work Order.
6. After you are completed and there are no remaining Work Orders on your schedule. You can hit “End Day” again and proceed home.
ENDING THE DAY
1. Once you have completed your last Work Order, select the END DAY option.
- Once you have selected this option, another prompt will pop up allowing for you to either TRAVEL HOME or END DAY.

- Most if not all of you will want to select the HOME option to have the log show you traveling home.
- The log will run until you are Home
2. Once you are home, hit the Timer button again and it will completely end the day for you.
3. If you stop the clock immediately, your day will end where you stopped the clock at.
INACTIVITY
As you will notice there is a INACTIVITY log after all jobs are completed. Once an action for END JOB has been completed, you will have to select your next action. As we know, there are times in which you are waiting for other information to become available or simply waiting to leave for unforeseen circumstances, you will notice an INACTIVE log created and running while you wait to select your next action. If this log is under 5 minute, it will disappear. If it is over 5 minutes, you will be required to type in a description to highlight why the inactivity timer was running that long. In most cases, this will be paid time because the events for the delay were outside of your own circumstances. However, there may be other times in which case you will need to explain why the INACTIVITY log was X amount of minutes. In all cases, be aware that this log will run and you will need to type in a description of reason for it running.
