KEYNOTE Process Manual
Review work orders pending Accept/Decline
- Click on ‘Work Orders’ on the left-hand menu bar
- Click on ‘Pending Acceptance’
- Select ‘Accept’ or ‘Decline’
*To check on the status of the work order from the client portal to ensure the work order is available for acceptance, click on the three dots on the bottom right corner of the work order block and select ‘Refresh from Provider’

Review work orders pending a schedule date
- Click on ‘Scheduling’ on the left-hand menu bar
- Click on ‘Pending Scheduling’
- Choose from the following filter options as needed:
- GEO
- Click on ‘GEO’ next to the search box
- Type in an address in the open text field
- Double-click on the map to pinpoint a specific location
- Adjust your radius from the pinpoint location
- Select ‘Apply Filter’
- Priority
- Click on ‘PRIORITY’ next to the search box
- Select the priority code(s)
- Click on ‘Apply’
- State
- Click on ‘STATE’ next to the search box
- Select the state(s)
- Click on ‘Apply’
- Return Visit Only
- Select the checkbox
- This is to be used to view all work orders that require a technician to return to the job site for completion
- Previously known as “Waiting to Schedule”
- This is to be used to view all work orders that require a technician to return to the job site for completion
- Select the checkbox
- GEO
- Choose from the following sort options as needed:
- Priority
- Click on ‘SORT’ on the upper right side of the screen
- Select ‘Priority’
- Click on ‘Apply’
- Respond SLA
- Click on ‘Respond SLA’ on the upper right side of the screen
- Select ‘Priority’
- Click on ‘Apply’
- Priority

Scheduling a work order
- Click on ‘Scheduling’ on the left-hand menu bar
- Click on ‘Pending Scheduling’
- Click on the work order number found on the work order block
- Minimize the work order summary by (OPTIONAL)
- Double-clicking the work order number found to the right of the gray priority code box
- Click ‘Options’ Click ‘Hide Summary’
- Click on the settings icon on the bottom left corner of the calendar view (OPTIONAL)
- This will allow to adjust the calendar from the standard Sunday thru Saturday to a Monday thru Friday view or a single day view
- Click on the people icon under the work order summary
- Click on the eye icon on the right corner of the pop-up window to view each technicians name separately under the work order summary (OPTIONAL)
- Enabling this feature will allow to toggle on/off their schedule on this calendar view
- Click on the eye icon on the right corner of the pop-up window to view each technicians name separately under the work order summary (OPTIONAL)
- Select the applicable technicians from the list
- Click on ‘Apply’
- Double-click the calendar on the appropriate date and time for the appointment
- The appointment block will appear with a dotted-line border to indicate the appointment block is not yet saved or scheduled
- Double-click the appointment block
- Adjust the date and time as applicable
- Choose a technician from the drop-down menu
- Click on the lock icon on the bottom right of the pop-up box
- Click on ‘Save’
- This step will display the appointment block as a solid color with no border indicating the appointment is saved and scheduled

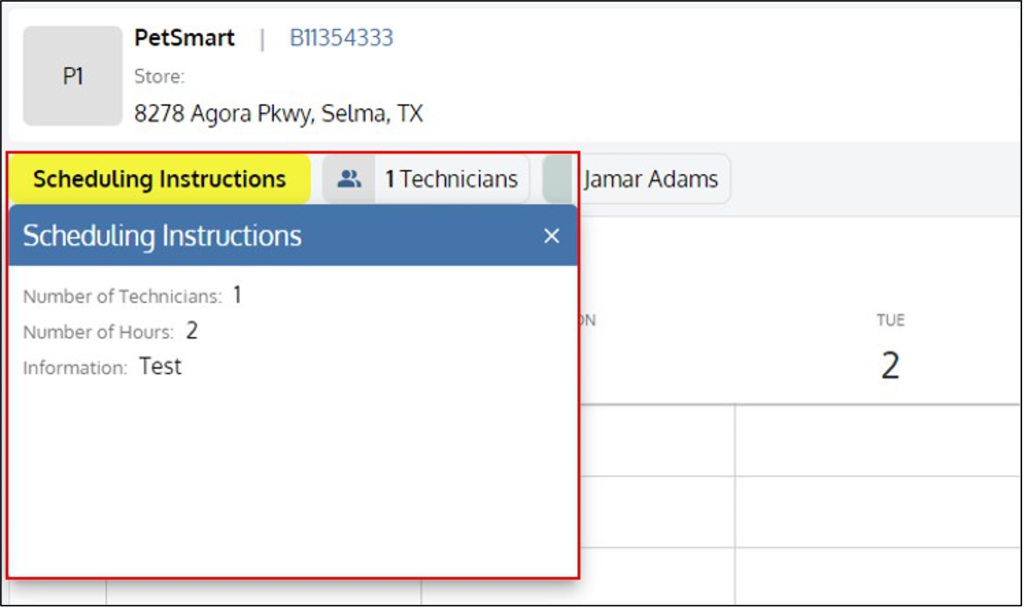
Scheduling a work order with ‘Scheduling Instructions’
- Click on ‘Scheduling’ on the left-hand menu bar
- Click on ‘Pending Scheduling’
- Click on the work order number found on the work order block
- Minimize the work order summary by (OPTIONAL)
- Double-clicking the work order number found to the right of the gray priority code box
- Click ‘Options’ -> Click ‘Hide Summary’
- Click on the settings icon on the bottom left corner of the calendar view (OPTIONAL)
- This will allow to adjust the calendar from the standard Sunday thru Saturday to a Monday thru Friday view or a single day view
- Click on the yellow box that says ‘Scheduling Instructions’ to review appointment specific instructions
- Click on the people icon under the work order summary
- Click on the eye icon on the right corner of the pop-up window to view each technicians name separately under the work order summary (OPTIONAL)
- Enabling this feature will allow to toggle on/off their schedule on this calendar view
- Click on the eye icon on the right corner of the pop-up window to view each technicians name separately under the work order summary (OPTIONAL)
- Select the applicable technicians from the list
- Click on ‘Apply’
- Double-click the calendar on the appropriate date and time for the appointment
- The appointment block will appear with a dotted-line border to indicate the appointment block is not yet saved or scheduled
- Double-click the appointment block
- Adjust the date and time as applicable
- Choose a technician from the drop-down menu
- Click on the lock icon on the bottom right of the pop-up box
- Click on ‘Save’
- This step will display the appointment block as a solid color with no border indicating the appointment is saved and scheduled
Scheduling a work order for a contractor
- Click on ‘Work Orders’ on the left-hand menu bar
- Choose to either:
- Type in a specific work order number in the search bar above the blue bar
- Select applicable status filters then click on the specific work order number in the work order block
- Click on ‘Options’ on the right side of the work order screen
- Click on ‘Scheduling’
- Minimize the work order summary by (OPTIONAL)
- Double-clicking the work order number found to the right of the gray priority code box
- Click ‘Options’ -> Click ‘Hide Summary’
- Click on the settings icon on the bottom left corner of the calendar view (OPTIONAL)
- This will allow to adjust the calendar from the standard Sunday thru Saturday to a Monday thru Friday view or a single day view
- Double-click the calendar on the appropriate date and time for the appointment
- The appointment block will appear with a dotted-line border to indicate the appointment block is not yet saved or scheduled
- Double-click the appointment block
- Adjust the date and time as applicable
- Click on ‘Contractor Appointment’
- Type the contractor name into the ‘Contractor’ field
- Click on the lock icon on the bottom right of the pop-up box
- Click on ‘Save’
- This step will display the appointment block as a solid color with no border indicating the appointment is saved and scheduled

Scheduling multiple technicians per appointment block
- If viewing a technicians schedule on the ‘Technician View’ screen or if on the ‘Scheduling’ screen, proceed to step 12 otherwise, proceed to step 2
- Click on ‘Home’ on the left-hand menu bar
- Type in the work order number in the search bar and hit ‘enter’
- Click on the work order number
- Click on ‘Options’ on the right side of the work order screen
- Click on ‘Scheduling’
- Click on the gray priority code box to highlight the appointment block
- Locate the appointment block in the calendar
- Right-click the appointment block and click on the copy icon
- Double-click the appointment block
- Choose the additional technician from the drop-down menu
- Click on the lock icon on the bottom right of the pop-up box
- Click on ‘Save’
- This step will display the appointment block as a solid color with no border indicating the appointment is saved and scheduled
*Repeat these steps for as many additional technicians are required per appointment block

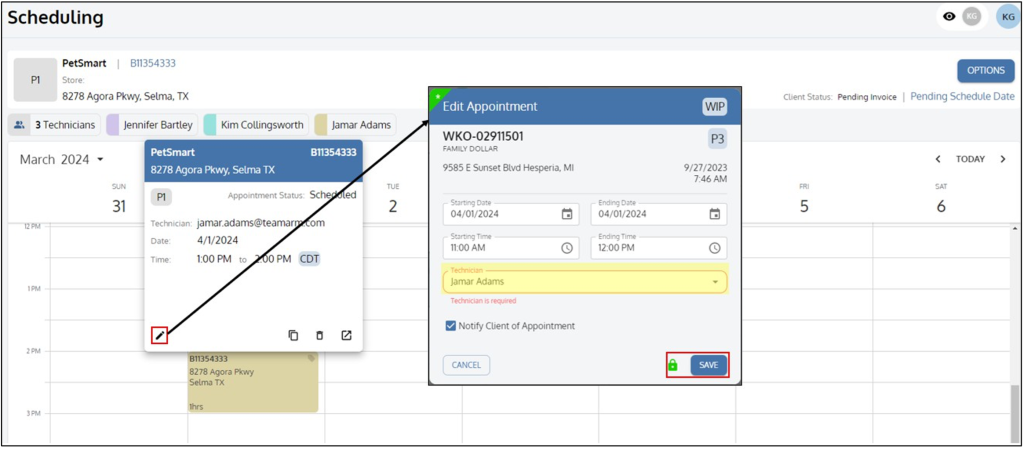
Changing a technician assignment for an appointment block
- If viewing a technicians schedule on the ‘Technician View’ screen or if on the ‘Scheduling’ screen, proceed to step 12 otherwise, proceed to step 2
- Click on ‘Home’ on the left-hand menu bar
- Type in the work order number in the search bar and hit ‘enter’
- Click on the work order number
- Click on ‘Options’ on the right side of the work order screen
- Click on ‘Scheduling’
- Click on the people icon under the work order summary
- Click on the eye icon on the right corner of the pop-up window to view each technicians name separately under the work order summary (OPTIONAL)
- Enabling this feature will allow to toggle on/off their schedule on this calendar view
- Click on the eye icon on the right corner of the pop-up window to view each technicians name separately under the work order summary (OPTIONAL)
- Select the applicable technicians from the list
- Ensure the current assigned technician is selected
- Click on ‘Apply’
- Click on the gray priority code box to highlight the appointment block
- Locate the appointment block in the calendar
- Right-click the appointment block and click on the pencil icon
- Choose a technician from the drop-down menu
- Click on the lock icon on the bottom right of the pop-up box
- Click on ‘Save’
- This step will display the appointment block as a solid color with no border indicating the appointment is saved and scheduled
Adjusting the time and/or date of a scheduled work order
- If viewing a technicians schedule on the ‘Technician View’ screen or if on the ‘Scheduling’ screen, proceed to step 12 otherwise, proceed to step 2
- Click on ‘Home’ on the left-hand menu bar
- Type in the work order number in the search bar and hit ‘enter’
- Click on the work order number
- Click on ‘Options’ on the right side of the work order screen
- Click on ‘Scheduling’
- Click on the gray priority code box to highlight the appointment block
- Locate the appointment block in the calendar
- Right-click the appointment block and click on the pencil icon
- OR pull the appointment block up or down to extend the time and “drag and drop” the appointment block to change the time and/or date
- Choose a technician from the drop-down menu
- Click on the lock icon on the bottom right of the pop-up box
- Click on ‘Save’
- This step will display the appointment block as a solid color with no border indicating the appointment is saved and scheduled

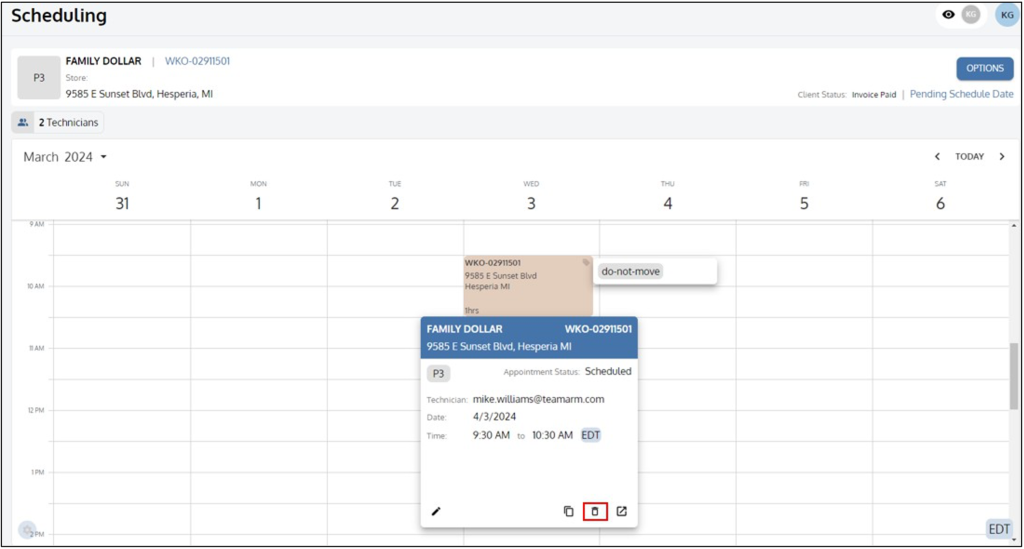
Deleting a scheduled work order
- If viewing a technicians schedule on the ‘Technician View’ screen or if on the ‘Scheduling’ screen, proceed to step 12 otherwise, proceed to step 2
- Click on ‘Home’ on the left-hand menu bar
- Type in the work order number in the search bar and hit ‘enter’
- Click on the work order number
- Click on ‘Options’ on the right side of the work order screen
- Click on ‘Scheduling’
- Click on the gray priority code box to highlight the appointment block
- Locate the appointment block in the calendar
- Right-click the appointment block and click on the trash icon
Creating a saved list to view scheduled
- Click on ‘Scheduling’ on the left-hand menu bar
- Click on ‘Technician View’
- Click on the people icon under ‘Technician Scheduling View’
- Click on the eye icon on the right corner of the pop-up window to view each technicians name separately under the work order summary (OPTIONAL)
- Enabling this feature will allow to toggle on/off their schedule on this calendar view
- Click on the eye icon on the right corner of the pop-up window to view each technicians name separately under the work order summary (OPTIONAL)
- Select the applicable technicians from the list
- Click on ‘Apply’
- Click on the heart icon on the corner of the people icon box
- Type a name your favorites list
- Click on ‘Save’
*To create another favorites list, complete these steps again
**To delete a favorites list, click on the heart icon on the corner of the people icon box and click on the red circle next to the open text box

Creating a reserved time block on a technicians schedule
- Click on ‘Scheduling’ on the left-hand menu bar
- Click on ‘Technician View’
- Click on the people icon under ‘Technician Scheduling View’
- Click on the eye icon on the right corner of the pop-up window to view each technicians name separately under the work order summary (OPTIONAL)
- Enabling this feature will allow to toggle on/off their schedule on this calendar view
- Click on the eye icon on the right corner of the pop-up window to view each technicians name separately under the work order summary (OPTIONAL)
- Select the applicable technicians from the list
- Click on ‘Apply’
- Double-click the calendar on the appropriate date and time for the appointment
- The appointment block will appear with a dotted-line border to indicate the appointment block is not yet saved or scheduled
- Double-click the appointment block
- Type the reason for the time block in the ‘Description’ box
- Adjust the date and time as applicable
- Choose a technician from the drop-down menu
- Click on the lock icon on the bottom right of the pop-up box
- Click on ‘Save’
- This step will display the appointment block as a solid color with no border indicating the appointment is saved and scheduled
*Reserved time blocks can be used for PTO, meetings, late-starts, etc.

Viewing a work order
- Click on ‘Work Orders’ on the left-hand menu bar
- Choose to either:
- Type in a specific work order number in the search bar above the blue bar
- Select applicable status filters then click on the specific work order number in the work order block

Viewing technician job notes and time
- Click on ‘Work Orders’ on the left-hand menu bar
- Choose to either:
- Type in a specific work order number in the search bar above the blue bar
- Select applicable status filters then click on the specific work order number in the work order block
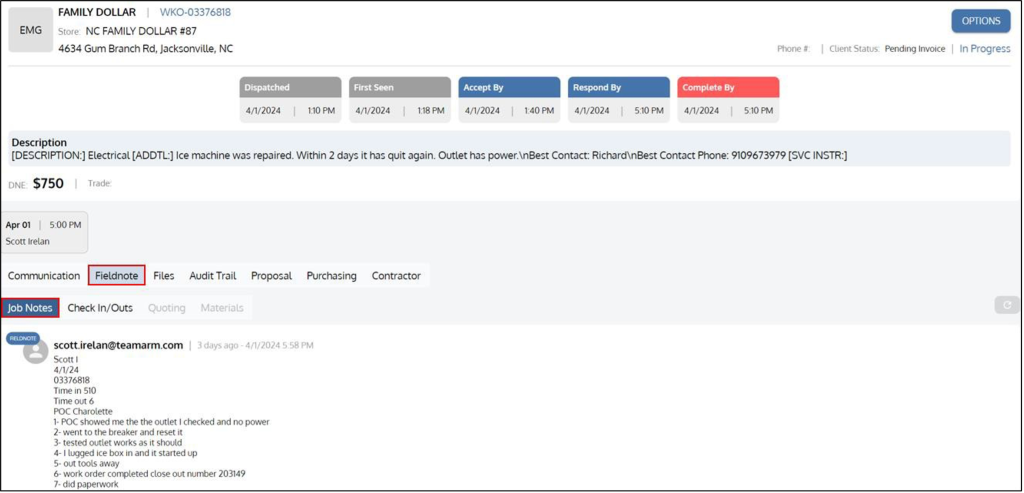
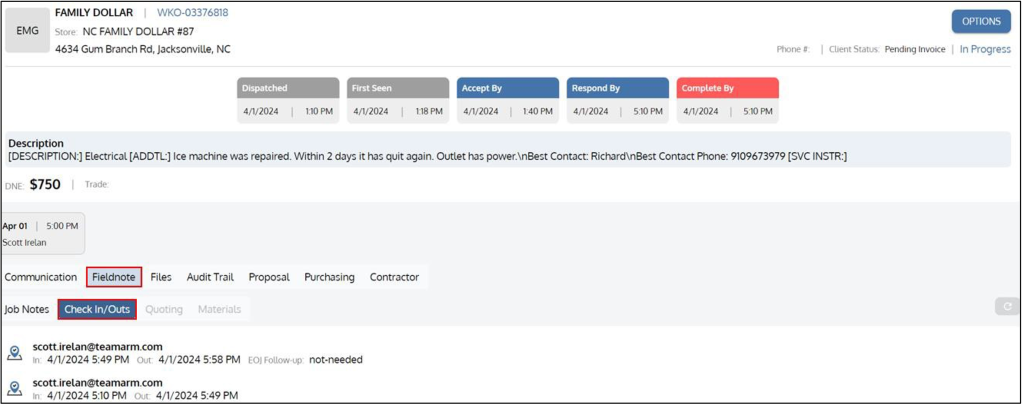
- Click on the ‘Fieldnote’ tab under the work order summary
- Under this tab you will see:
- Job Notes
- Check In/Outs
- Quoting
- Materials
- Under this tab you will see:
*The Fieldnote tab is a ‘read-only’ view meaning no edits will be able to be made to any of the information inputted by the technician on the Fieldnote application
Viewing a work order status
- Click on ‘Work Orders’ on the left-hand menu bar
- Choose to either:
- Type in a specific work order number in the search bar above the blue bar
- Select applicable status filters then click on the specific work order number in the work order block
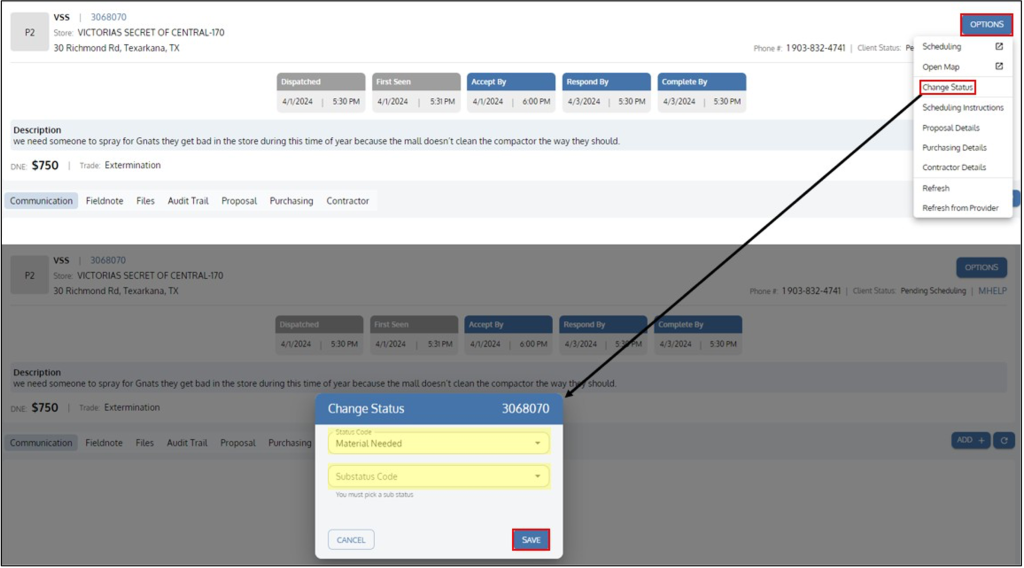
- Click on ‘Options’ on the right side of the work order screen
- Click on ‘Change Status’
- Choose a ‘Status Code’ from the drop down box
- Dependent on the status chosen, you may be required to select a ‘Substatus Code’ which will indicate the department managing this step of the work order flow
- Click on ‘Save’
Adjusting Response and Complete By SLA times
- Click on ‘Work Orders’ on the left-hand menu bar
- Choose to either:
- Type in a specific work order number in the search bar above the blue bar
- Select applicable status filters then click on the specific work order number in the work order block
- Click on the top right corner of the SLA block
- A pencil icon will be visible when hovering over the SLA block
- Adjust the date/time to reflect the updated SLA dates
- Click on Save

Creating a note on a work order
- Click on ‘Work Orders’ on the left-hand menu bar
- Choose to either:
- Type in a specific work order number in the search bar above the blue bar
- Select applicable status filters then click on the specific work order number in the work order block
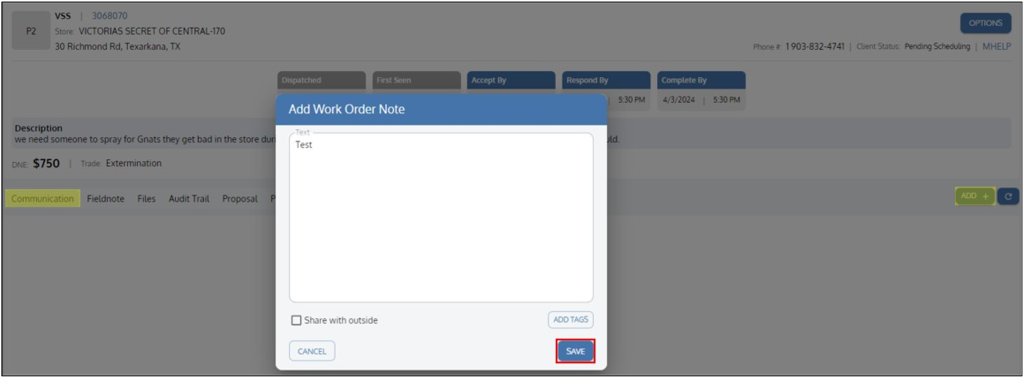
- Click on the ‘Communication’ tab under the work order summary
- Click on the ‘Communication’ tab again to maximize this tab
- Click on ‘ADD +’ on the far right of the work order screen
- Type your note in the open text field box
- Click on ‘Share with outside’ -> Click on ‘Save’ (OPTIONAL)
- Sharing with the outside will add the note on the work order under the respective clients portal (FEATURE CURRENTLY DISABLED)
- Click on ‘ADD TAGS’ -> Click on ‘Save’ (OPTIONAL)
- Tags are to be used to flag a note with a specific reason
- Tags should be used for all contractor related communication and updates
- Click on ‘Share with outside’ -> Click on ‘Save’ (OPTIONAL)
- Click on ‘Save’
Creating a proposal, purchasing and contractor form
- Click on ‘Work Orders’ on the left-hand menu bar
- Choose to either:
- Type in a specific work order number in the search bar above the blue bar
- Select applicable status filters then click on the specific work order number in the work order block
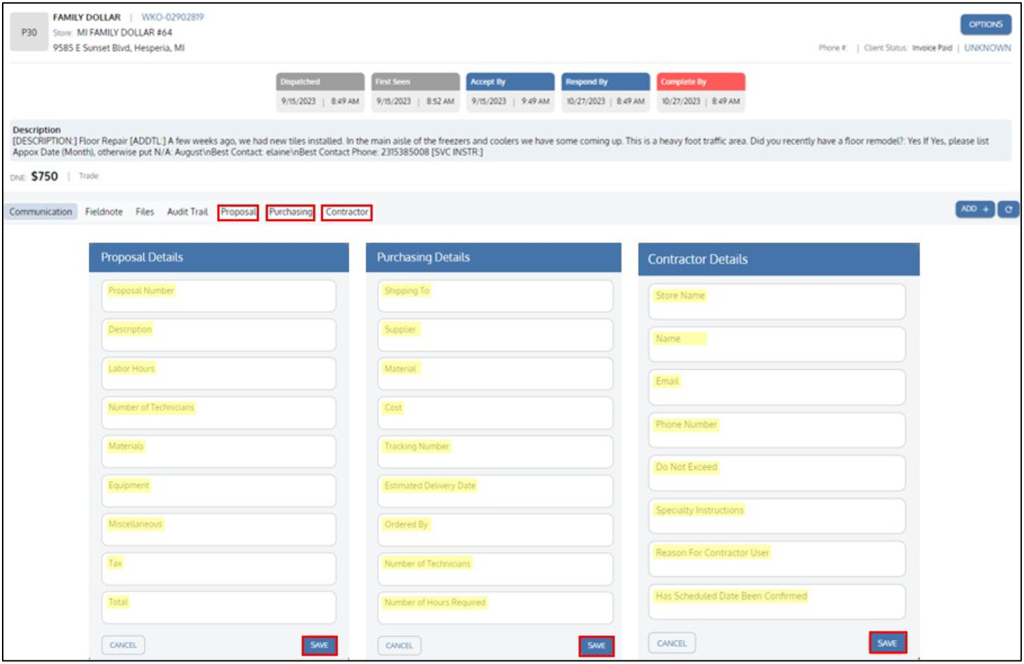
- Click on the:
- ‘Proposal’ tab under the work order summary
- Click on the ‘Proposal’ tab again to maximize this tab
- This tab is to be used for all proposals submitted to the client for review
- ‘Purchasing’ tab under the work order summary
- Click on the ‘Purchasing’ tab again to maximize this tab
- This tab is to be used for all material purchases related to the specific work order
- ‘Contractor’ tab under the work order summary
- Click on the ‘Contractor’ tab again to maximize this tab
- This tab is to be used to document any contractors that were requested to perform work on the specific work order
- ‘Proposal’ tab under the work order summary
- Click on the edit icon on the right side of the screen
- Fill in the respective fields
- Click on ‘Save’
*To edit these fields or to delete the data in these fields, complete steps 3 thru 6
Creating a contractor work order request
- Click on ‘Work Orders’ on the left-hand menu bar
- Choose to either:
- Type in a specific work order number in the search bar above the blue bar
- Select applicable status filters then click on the specific work order number in the work order block
- Click on the ‘ Contractor’ tab under the work order summary
- Click on the edit icon on the right side of the screen
- Fill in the respective fields
- All information inputted into these fields will reflect on the work order PDF for the contractor
- Click on ‘Save’
- Click on the download icon
- Select the applicable appointment date
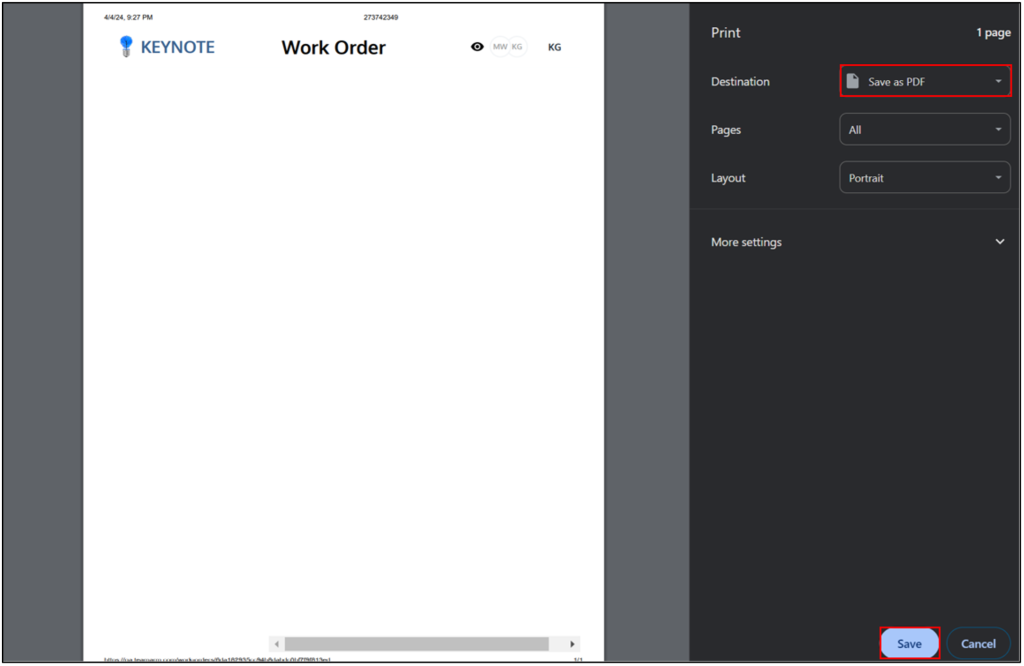
- When the new browser window opens, right-click on the webpage
- Click on ‘Print’
- Change the ‘Destination’ to ‘Save as PDF’
- Click on ‘Save’
- Under ‘File Name’, rename the PDF to your liking
- Click on ‘Save’
*The saved PDF should be used as an attachment in your email correspondence to the contractor
Creating scheduling instructions
- Click on ‘Work Orders’ on the left-hand menu bar
- Choose to either:
- Type in a specific work order number in the search bar above the blue bar
- Select applicable status filters then click on the specific work order number in the work order block
- Click on ‘Options’ on the right side of the work order screen
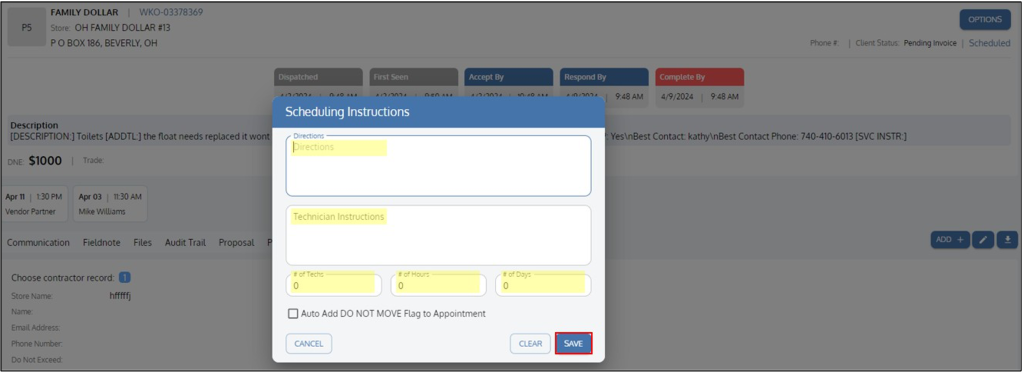
- Click on ‘Scheduling Instructions’
- Fill in the respective fields
- Directions
- This section is to be used to provide specific directions regarding scheduling the appointment
- Technician Instructions
- This section is to be used to provide specific directions to the technician for the appointment
- If the appointment should not be rescheduled after a schedule date is confirmed, click the checkbox for “Auto Add DO NOT MOVE Flag”
- Directions
- Click on ‘Save’
Managing files in the work order
- Click on ‘Work Orders’ on the left-hand menu bar
- Choose to either:
- Type in a specific work order number in the search bar above the blue bar
- Select applicable status filters then click on the specific work order number in the work order block
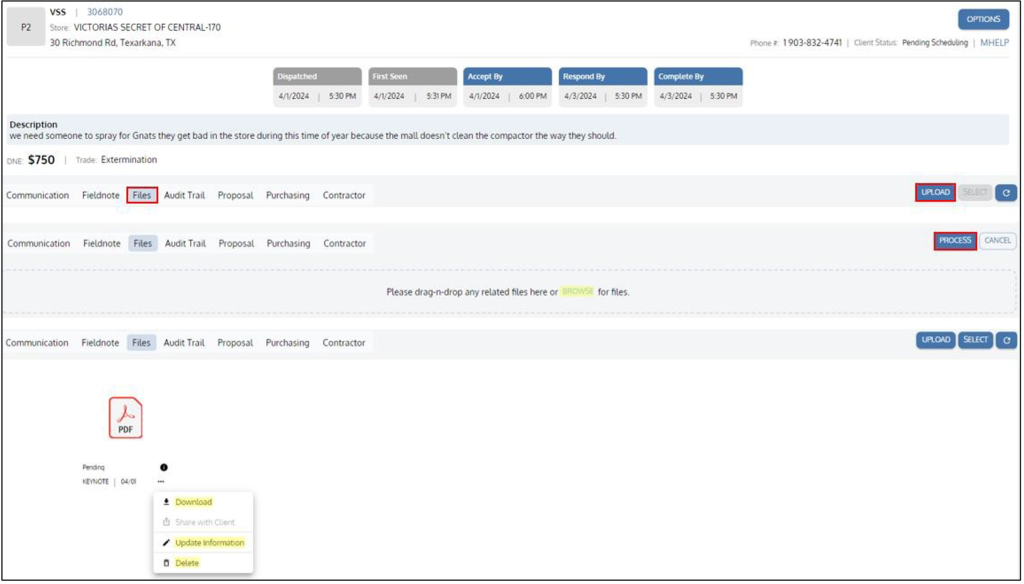
- Click on the ‘Files’ tab under the work order summary
- To:
- Add a file
- Click on ‘UPLOAD’ on the right side of the screen
- Click on ‘BROWSE’ or “drag and drop” a file in the dashed box
- If clicking ‘BROWSE’, select a file from the pop up box and click on ‘Open’
- Click on ‘PROCESS’ on the right side of the screen
- Download a file
- Choose the file to download
- Click on the three dots under the information icon
- Click on ‘Download’
- Delete a file
- Choose the file to delete
- Click on the three dots under the information icon
- Click on ‘Delete’
- Edit the caption
- Choose the file to edit the caption
- Click on the three dots under the information icon
- Click on ‘Update Information’
- Add a file
Additional features
Flag the work order as “DO NOT MOVE”
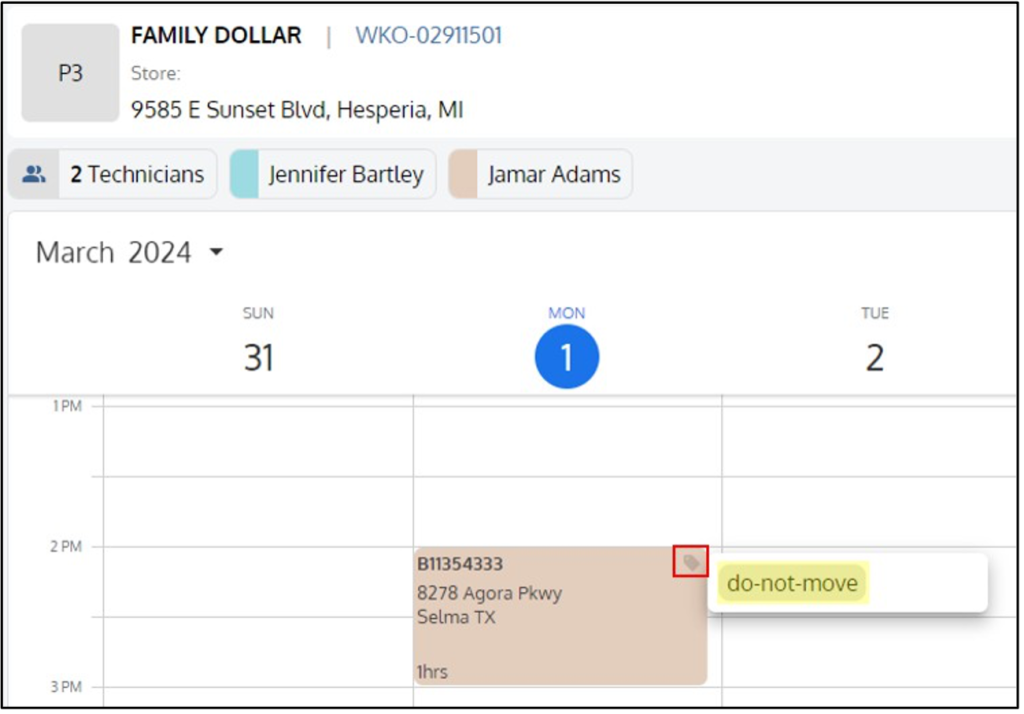
- While on the ‘Scheduling’ screen or ‘Technician View’ screen, click on the tag icon on the top right corner of the appointment block
- Click on “do-not-move”
- To remove the flag, repeat steps A and B
- This feature should be used for vendor meet ups, escalated work orders, etc.
- Flagging a work order as “DO NOT MOVE” will prevent the user from moving the work order to a different time/date
Ability to see how many users are in the same work order
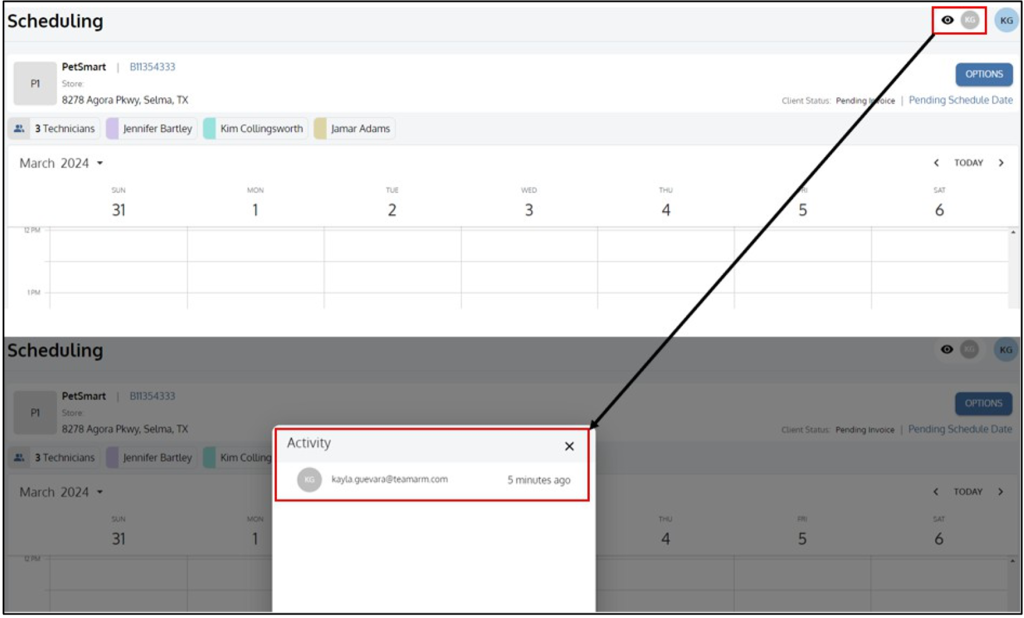
- You can see the active users by looking at the eye icon on the top right corner of the page
- Clicking on the eye icon will provide more details
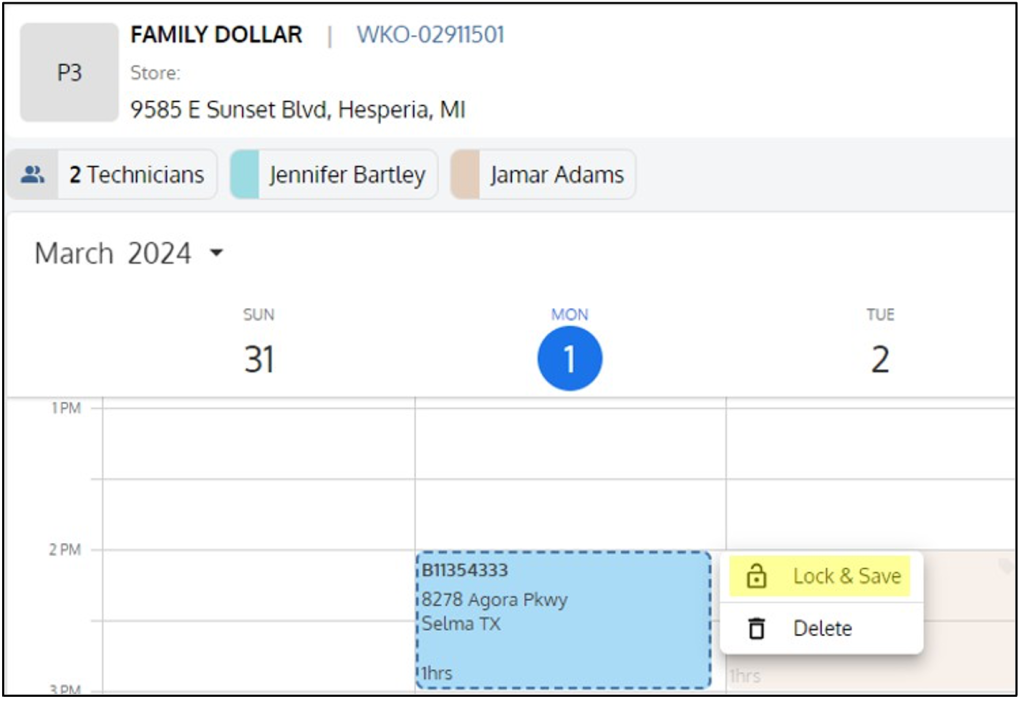
While on the ‘Scheduling’ screen or ‘Technician View’ screen, if moving a scheduled appointment to a different date or time, right click the appointment block and click ‘Lock & Save’ for a quick schedule save.
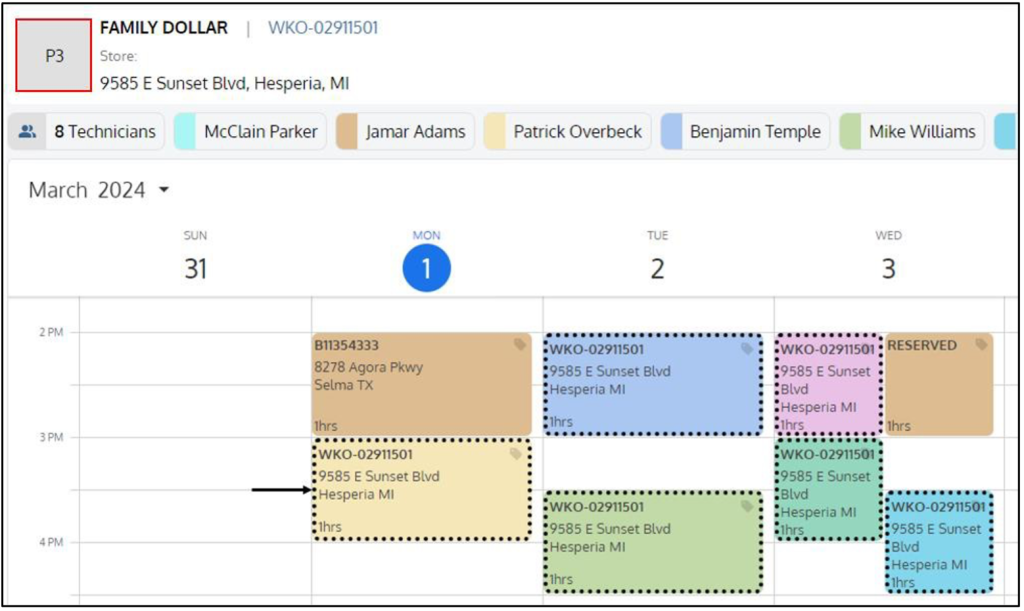
When there are multiple appointment blocks on the calendar view, clicking the priority code box will highlight the current appointment block for that specific work order
- Clicking on the priority code box again will remove the highlight
When on the work order screen, the ‘Complete By’ date box will appear as red if the work order is in an “open” status beyond the ‘Complete By’ date indicating that the work order is “overdue”

While on the ‘Scheduling’ screen, ‘Technician View’ screen, or the ‘Work Order’ screen, the appointment block will appear as:
- GREEN if a technician is currently checked into the work order and on-site
- GRAY if a technician has marked the work order as complete

While on the ‘Work Order’ screen, the current work order status on the client portal will be visible in the work order summary section under ‘OPTIONS’
- To refresh the client portal status, click on ‘OPTIONS’, then click on ‘Refresh from Provider’

To minimize the menu bar on the left side, click on the KEYNOTE icon on the top left-hand corner
- This will display a hamburger menu icon (three lines) allowing a maximized view of the different screens
- To lock the menu bar back on the left side, click the hamburger menu icon, then click on the KEYNOTE icon
